


 |
Bushwacker’s XJ Cut-Out Flares |
Seeing as how I’ve had my Bushwacker flares on for nearly a year now, I figure it’s about time to get this article done. Plus, I think I can now give a faily decent review of how they work on the trail.
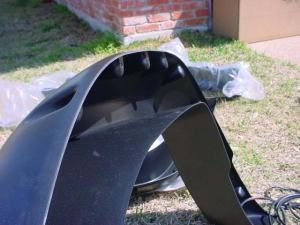
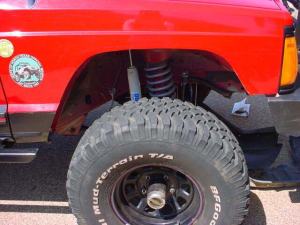
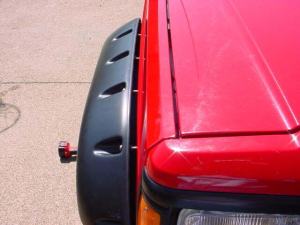
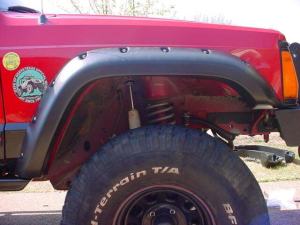
Let me first start out by saying these flares are big, no, make that HUGE. The fronts are just massive, sticking out about 4-5″ from the fender. With close to 6″ of lift, these flares made my 33’s look tiny. They do open up the wheel wells, but not as much as you’d think by looking at them because of a lip the wraps around the bottom of the flare, similar to the stock flares — you can see this “inner lip” in the pic on the right below. Why Bushwacker didn’t make these flares open at the bottom like their TJ flares is beyond me, they’d be so much better that way.
 |
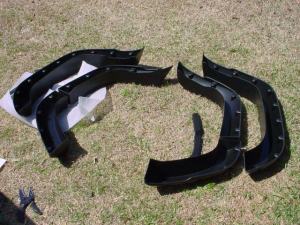 |
The flares are available for both 2- and 4-dr XJ’s, and they fit both new and old body styles the same. Mounting the flares on a ’97+ XJ requires a bit more attention due to the windshield washer fluid reservoir being located in the front driver-side fender. Other than that, they install the same on the new and old bodies. On the 4-dr models, the rear flares are split, with the front half mounting to the back door, and the rear half of the flare mounting to the body.
 |
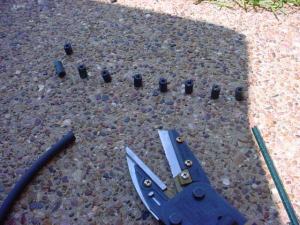 |
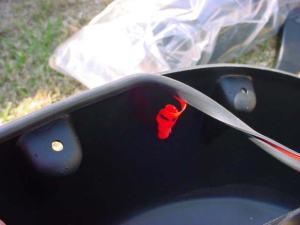
The first step is to apply the rubber edge guard moulding to the top edge of the flares. This takes a bit of time as you can only go about 1-2″ at a time. The moulding is to keep the relatively thick plastic of the flares from damaging your paint. Next you’ll want to cut spacers for the mounting bolts using the fuel hose included with the flares. I was a bit disappointed that Bushwacker didn’t include pre-cut spacers…
 |
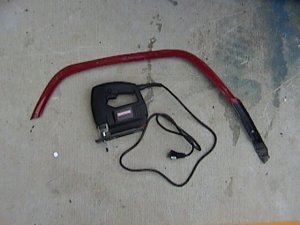 |
Now it’s time to hack some fender metal… Unfortunately I don’t have good pics of exactly how and where I cut, because I’d already cut out my fenders months before getting the new flares. Basically what I did was remove the OEM flares and use the flared section of the sheetmetal as a cutting guide. I used a sabersaw from Sears and some 1/4″ 28tpi metal cutting blades. This made short work of the fender, but wore out one blade per fender. I put masking tape over the fender to help mark where to cut and also protect the paint from the foot of the sabersaw.
 |
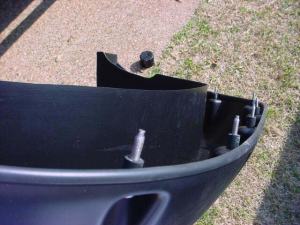 |
With the fender cut out, hold the flares up and position them where you want them front to rear. I pushed mine as far forward as possible. With the flare in place, use something thin and sharp (I used an awl) to mark the fender for the mounting holes in the flare. Since the flares mount using self-tapping bolts, I went down one drill bit size from what the instructions called for. I figured the extra metal in the hole would make for a more solid mounting. I alse went around using one of the bolts to “pre-tap” the holes, that way I’d have an easier time actually mounting the flares.
Once that’s all done, put a washer on each bolt, then put them through the holes in the flares and put one of those spacers you cut earlier on each bolt. These spacers keep the bolts from tearing through and also help prevent you from over tightening the bolts and stripping out the hole in the fender.
 |
 |
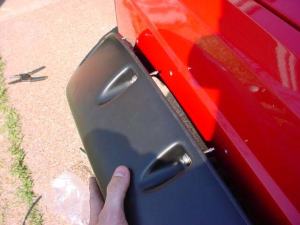
With all the bolts and spacers put on the flares, hold it up the holes you already drilled and “tapped” and start each bolt just a few turns. Keep doing this until the flare is evenly snugged up against the fender. The bolt down by the “body bulge” above the rockers is almost too short to work, so it might take a little help in getting that one started. Be careful not to over tighten the bolts, you want them nice and snug, but not so tight that the pockets start to deform any.
 |
 |
That’s it for the front, it’s really pretty easy. Oh yeah, you’ll have to remove any body moulding from the quarter panels and back doors in order to install the flares.
Now it’s time for the fun part (can you sense my sarcasm?)…
5 comments5 Comments so far
[…] […]
[…] […]
[…] […]
Hi there. great article for those of us going to fit these flares. I have obtained some second hand, and the comment I would make is that one of th lower “pockets” has broken right out. I didnt notice this before I bought them, and at the price I paid some damage was to be expected. It’s no biggy, I will fix it, but they sure aint indestructible. (Though Lord knows what he musta hit)
I did the same thing, i didnt want to cut into the body seams. Great writeup! Thanks