


 |
Replacing your drum brakes |
So, it’s time to replace the shoes in those pesky drum brakes and you want to save a little $$$ and have the satisfaction of doing the job yourself…Well, here’s how to do it:
note: I strongly recommend getting a factory service manual (FSM) or a Chilton’s manual before attempting this job, they will have good instructions and detailed diagrams showing each part and what it’s named. Also, do one side at a time so you can use the other side as a reference on how everything’s supposed to go.
 |
First off, jack up the back of the Jeep, support it on jack stands, and remove the rear wheels. Make sure the parking brake is NOT on, otherwise you’ll never get the drums off.
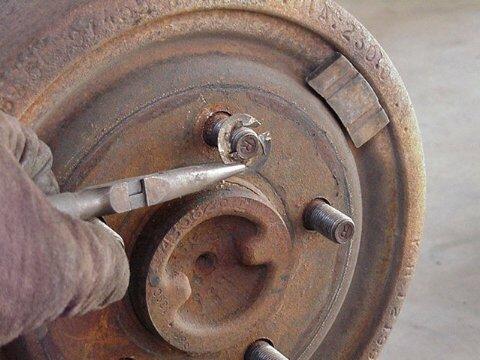
If this is the first time your drums are being serviced you’ll need to remove the “spring nuts” that hold the drums on. These are used in the factory to hold the drums on during assembly, so just throw them away, you won’t need them anymore. Now pull the drums off. If they don’t want to come off easily, a few light whacks with a hammer should loosen them up. |
| Inspect the inside of the drums. If the drums are scored or rough, you’ll need to have them turned. Most auto parts stores should be able to do this for you for pretty cheap. My drums looked fine so I didn’t bother with having them turned.
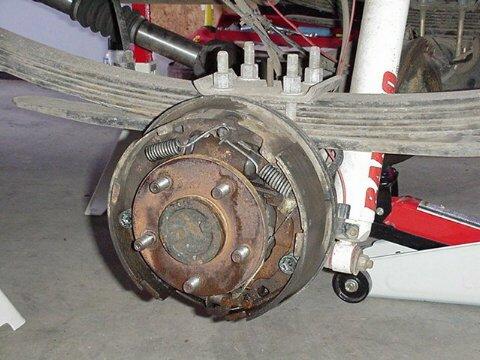
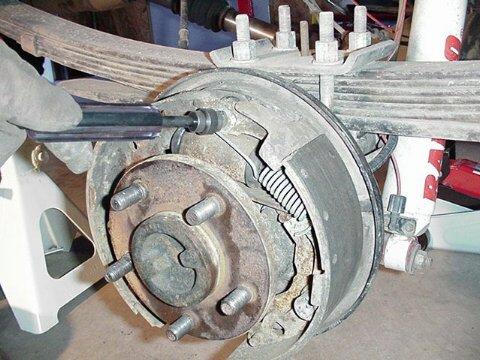
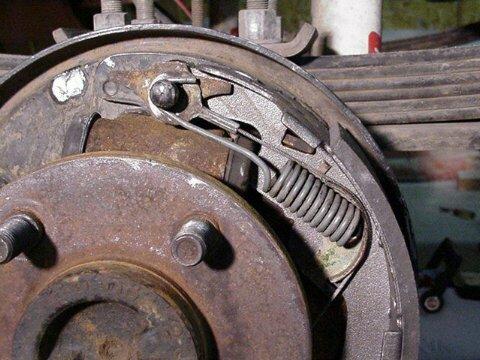
Once you get the drums off you should see a scene like this. Grab a can of brake cleaner and spray the brake assembly down to clean it. Caution: brake shoes contain asbestos so never use compressed air to clean the brakes and avoid inhaling any dust from any brake surface. Just to be on the safe side I wore a filter mask while I cleaned out the brake assemblies. |
 |
 |
Now it’s time to start taking apart the brakes. First remove the shoe spring shown here, just above the adjustment starwheel. I found a pair of needle-nose pliers works pretty good for this job.
Next unhook the adjuster cable from the adjuster lever and remove the adjuster lever. A repair manual (Chilton’s, FSM, etc.) will show you exactly what these are. |
| Next remove the shoe return springs. These are pretty strong little springs, so I’d recommend wearing eye protection, just in case. There is a special tool available at most auto parts stores design specifically for removing these springs. I found that a pair of lock pliers worked better for getting the first spring off though.
If you look in the bottom right corner of this photo, you can see the adjuster cable hanging loose. |
 |
 |
The brake spring removal tool (about $6 at AutoZone) worked great for getting the second return spring off the anchor pin, but you could use lock pliers for this spring also. The adjuster cable will come off the anchor pin once you remove the second return spring. The guide for the adjuster cable is hooked on this return spring, so don’t worry about taking the cable guide off the spring.
One end of the brake spring removal tool is used for removing the springs, the other end is used for putting the springs back on, you’ll see how later on. |
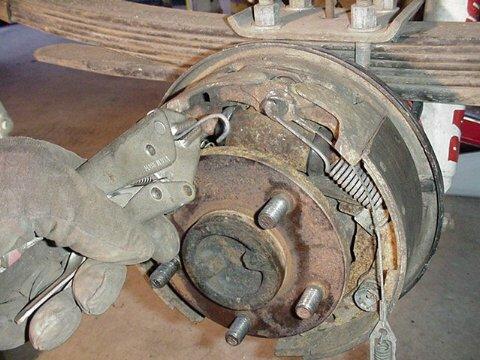
| Now it’s time to remove the holddown spring retainer. There is also a special tool just for this job (about $6 at AutoZone), but it doesn’t work well on the Dana 35’s drum brakes. I ended up using a pair of needle-nose pliers to remove the retainers. The retainers twist-lock onto holddown pins that go through the support plate and the shoe itself.
Once the retainers are removed the shoes should fall right off, so watch out. Remove the leading shoe first and pull out the parking brake strut and spring before moving on to the trailing shoe. |
 |
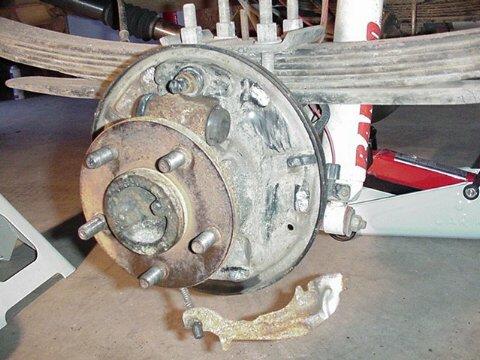 |
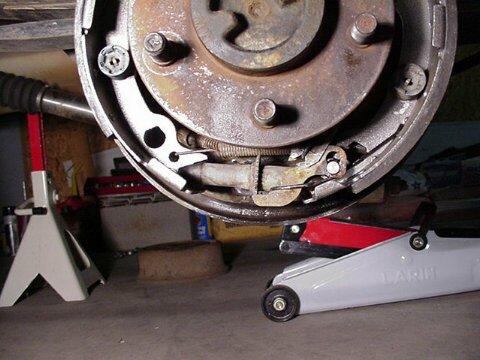
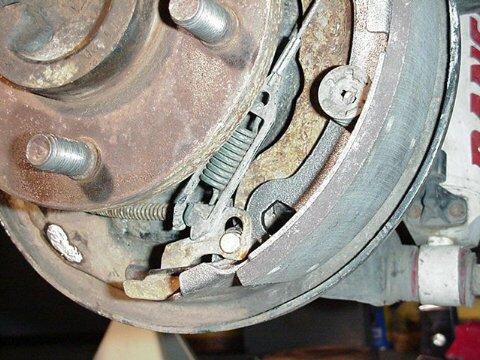
This is what it should look like once all the shoes, springs, and cables have been removed. The parking brake cable lever hooks into the shoe you just removed. You can see the parking brake cable lever hanging in this photo.
Now is a good time to hose down the assembly with brake cleaner so you have a nice, clean assembly for your new shoes. Again, watch the dust, I put the filter mask back on to clean the assembly again. |
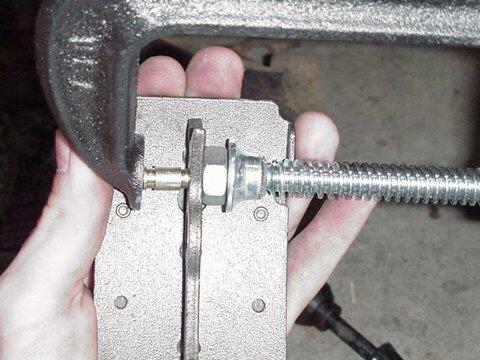
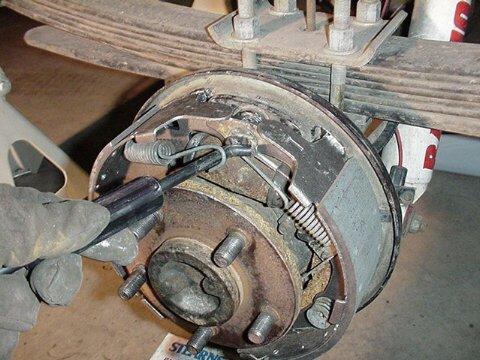
| Now it’s time to start reassembling the brakes. The first thing that needs to be done is to press the pins into the trailing shoes (the shoes closest to the back of the Jeep). If you look at the shoes you just took off, you’ll see the pin and how it’s supposed to be oriented.
Your new shoes should have come with 2 new pins. They’re a tight fit, so you’ll have to press them in. I used a C-clamp and a small nut to press the pin into the shoe. |
 |
 |
Once you have the pins pressed in (one pin for each trailing shoe), reinstall the adjuster lever and lever spring as shown.
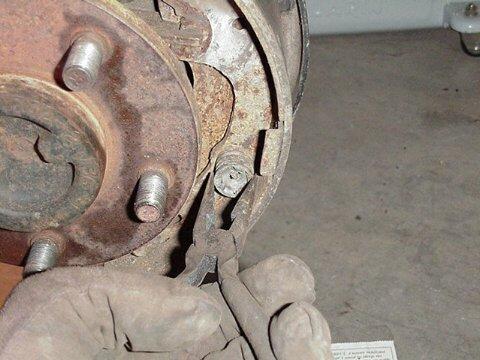
On the support/backing plate you should see where the shoes rub against it. Make sure this area is clean and put some antiseize or Lubriplate on it. Apply some to the anchor pin as well where the shoes come in contact with it. If you look back to the past photo on the first page, you can see where I’ve applied antiseize compount to the backing plate. |
| Hook the parking brake cable lever to the new trailing shoe.
Now hold the trailing shoe in place and replace the holddown pin and holddown retainer spring. Put the adjuster cable back on the anchor pin, then using the spring removal tool or some lock pliers, replace the trailing shoe return spring. |
 |
 |
Put some lube or grease on the cable guide or the cable itself and reconnect the cable to the adjuster lever.
Here you can see the parking brake cable lever sitting behind the new trailing shoe, the lever is the rusty-looking thing behind the springs. |
| Put the parking brake strut and spring back in and replace the leading shoe and its holddown pin and retainer spring.
Using the brake spring removal tool or lock pliers, replace the leading shoe’s return spring. Make sure the parking brake strut is positioned correctly. |
 |
 |
You’re almost done. The assembly should be looking almost just like it did before you started taking it apart, only cleaner and with thicker drum shoes. |
| Now just replace the shoe spring and adjustment starwheel. You’ll need to adjust the starwheel all the way in to get the shoes to close enough to get the drums back on. Give the assembly a quick spray with brake cleaner to get off any dirt you may have loosened while installing the new shoes.
Now put the drums back on, they should just barely slide back on. Oh, make sure the drums are clean before you put them back on. |
|
Put the wheels back on and you’re done. Take it for a spin and follow the adjustment instructions given in your service manual. Test to make sure the drums are working properly and you’re ready to hit the trails again. Oh, in case your wondering, the trailing shoe has more material on it than the leading shoe does, that’s how you tell them apart by looking at them…
Comments are off for this post