


 |
XJ Glow Gauges |
Installation date: 1/28/02
Note: Jeep Glow Gauge kits are available through 4x4mods.com.
I hadn’t really planned on doing a write-up on this mod, but due to popular demand, here it is. I bought the kit off e-bay. You’ll notice I’ll use the word “carefully” a lot in this article, and that’s for good reason. Great care must be used when installing this kit to avoid damaging or breaking the gauges or needles. If you do break one, they’re rather expensive to replace, even from a salvage yard.
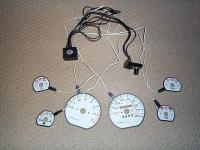
The kit is actually very high quality, the glow overlays match the OEM gauges perfectly. You get 6 glow overlays, connecting harness, control box and switch, and instructions.
The switch controls the intensity of the gauges as well as allowing you to switch between blue and green colors. A 6-color touch pad is also available, but it costs extra.
The first step is to completely remove your gauge cluster from your XJ. This involves removing the dash bezel and then unscrewing and unplugging the cluster itself.
What you see is my cluster with my original white face kit. The glow kit was installed over the existing white face kit, in case you were wondering.
 |
 |
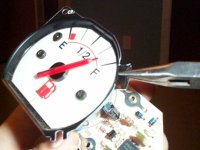
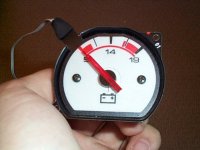
Now that you have the cluster out, you’ll need to carefully remove each individual gauge from the housing. Since the glow overlays have a tab that the harness connects to, you’ll want to cut a slot in the rim of the metal OEM face so the overlay lays flat. To do this, carefully hold the corresponding overlay up to the gauge face and mark where the tab his the gauge rim. I used a set of wire nippers to snip the edges.
Next carefully bend the tab down flat. I found a set of needle-nose pliers worked very well and allowed me to flatten out the bend as well.
 |
 |
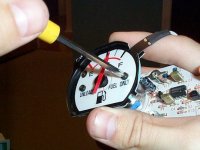
Remove the two small Phillips-head screws that hold the metal face to the gauge itself. The metal face will come loose. Carefully tip the metal face down away from the long end of the needle and slip the glow overlay onto the gauge and over the needle easier.
The overlays are designed so that you do not have to remove the needles to install them, which could damage or break the needle.
With the overlay slipped over the needle and in position, replace the small screws that hold the face to the gauge. Don’t over tighten them, it could damage the glow material.
 |
 |
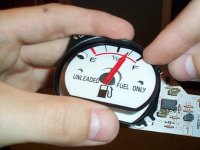
As you can see, the overlays are a perfect fit and match for the OEM gauges.
Cutting the slots for the tabs allows the overlays to sit flat on the gauge face and makes for a more professional looking install in my opinion.
Once all the overlays have been installed, put the gauges back into the cluster housing. If you choose to remove the OEM cluster lights from the back of the housing, you can pass the overlay connectors through the holes left by the OEM lights, otherwise you’ll need to bunch the wires up and run them out the side as I’ve done below.
 |
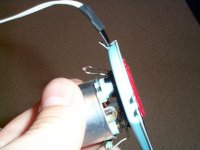 |
If you do remove the OEM lights, you won’t be able to see or read your odometer at night. I chose to leave the OEM lights in so that I could still see the odometer at night. The glow doesn’t look as good at night as a result, but it was a trade off I was willing to make.
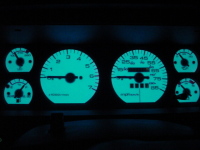
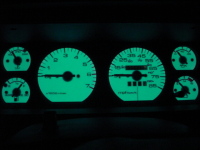
The final result! This is what the gauges look like in blue, which is the color I prefer. They can also be switched to green as shown below if you want. The photos were taken with the gauges set to full intensity, which looks the best but is also way too bright for driving and lights up the whole interior. I usually have mine set for about 50% intensity and find that still looks good but doesn’t put too much light.
 |
 |
You’re probably wondering where I mounted the control box and switch. Well, all I did was tuck them down behind the dash. I never really found a good place to mount the control panel that didn’t require taking it apart first (which would mean unsoldering some wire connections), so I just tuck it up behind the bottom of the dash and only pull it out to adjust the glow, which isn’t very often. At first I played with the color and intensity a lot, but like my old RS9000’s, I eventually just found a setting I liked and left them there.
Well, that’s about it. Oh yeah, almost forgot! You’ll need to find a 12V power source for the lights. The instructions warn against using a source that’s dimmed by the OEM dimmer switch (easier said than done), but I accidentally used one anyway and it hasn’t harmed my overlays at all. Granted, I never use the OEM dimmer to dim the dash lights though. I’ve been extremely happy with the kit, it looks great and the white faces really dress up the gauges during the day.
And for those of you that think glow gauges are “rice”, well, they’re starting to pop up as factory items on many Chrysler vehicles now, including the new Jeep Grand Cherokee Limiteds. Heh-heh…
4 comments4 Comments so far
this dont help me to figure out where to connect the red and black wires to switch the gauges lights on all i can find is direct power none of the wiring harness has the dimmer control wire or running lights so how the hell does the dash lights turn on and off ??
oh ya i got a 04 jeep grand cherokee
hello do you have these for mitsubishi lancer mirage 1997-2002
This write-up was exceptional and very informative. It answered all my question while installing the glow gauges. Thank you very much.