


 |
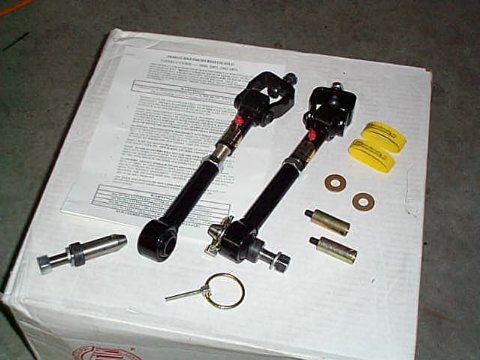
JKS Quicker Disconnects |
Installation date: 12/22/99
JKS, the company that developed the first commercial swaybar quick disconnects, has done it again. Their new “Quicker” disconnects look to be the easiest to use disconnects yet, and they’re super quiet too. I’ve been through two other sets of discon’s (Rubicon Express and Tomken), and the new JKS discon’s are by far the best I’ve used. To disconnect your swaybar all you do is pull one pin for each link, then just slide the discon off the steel mounting pin and swing the swaybar up and out of the way. Fasten it all up and you’re ready to hit the trails.
The key to JKS’ new discon’s are their spherical poly bushings (one at each end) which allow the links to slide sideways off the axle mounting pin, but stay bolted to the swaybar at the top. They also allow the swaybar to be reconnected even when you’re on uneven ground (which usually isn’t possible with other types of discon’s). In addition, these special bushings are also greasable for a long, quiet life (one zerk greases both bushings).
The discon’s are available in 3 sizes, for rigs from stock height up to 6″ of lift, and they are also length-adjustable for your specific suspension height, so it’s not like a one-size-fits-all kind of deal like with other brands of disconnects. And, since the length is adjustable, you can make one link longer or shorter than another to compensate for uneven suspension heights.
 |
Installing the discon’s is a snap, and JKS provides very good instructions, complete with diagrams. The only tools you’ll need for the install are a 6mm allen wrench/driver and some standard wrenches. TJ owners will also need a 1/4″ drill bit and a heavy-duty 5/16″ screw tap to drill and tap the frame.
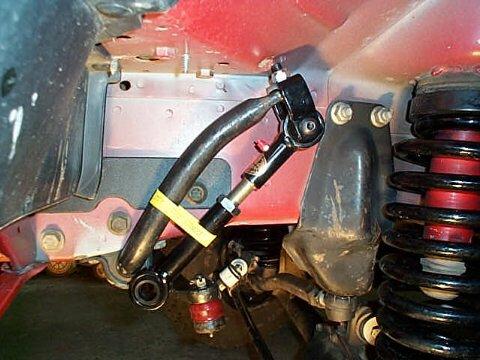
The yellow rubber bands are supplied for us XJ/ZJ owners who can’t use the holding pins that TJ owners get to use, you see why later… |
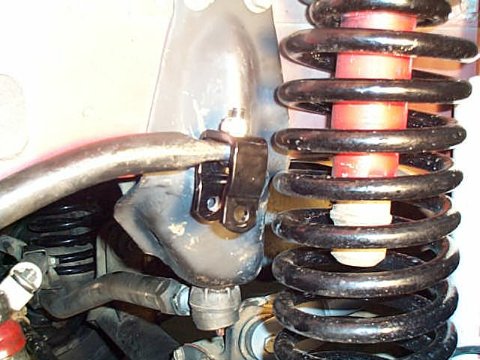
| Once the stock swaybar links and mounting pins have been removed, the first order of business is to install the u-strap on the swaybar. This is where that 6mm Allen wrench first comes in handy. The u-strap is installed on top of the swaybar, this way when the axle droops (like when your rig is up on the frame lift getting those new bigger tires you’ve always wanted), all the force is taken by the u-strap, not the center bolt itself. |
 |
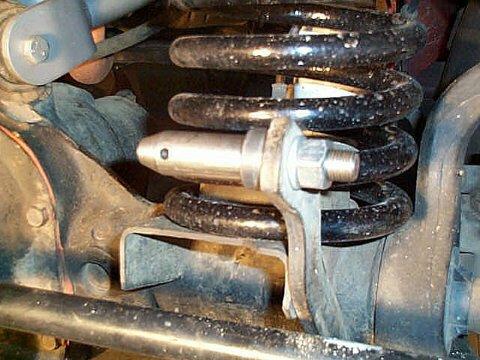 |
Next, install the new mounting pin on the axle tab, making sure the click-pin hole is horizontal so you can get remove/replace the click-pin easily.
On some rigs, the factory mounting pin is splined and pressed into the tab. If this is the case, you’ll probably have to cut the pin off and press the remainder out with a gear puller or drill it out. Some people have been able to heat the tab with a torch and just pound the pin out though. |
| Now adjust the length of your discon links so that your swaybar is in the proper position (you want the u-strap to be as close to vertical as possible) and tighten the jam nut.
Once you have the length set, re-install the discon link in the u-strap (you’ll need that 6mm allen wrench again). |
 |
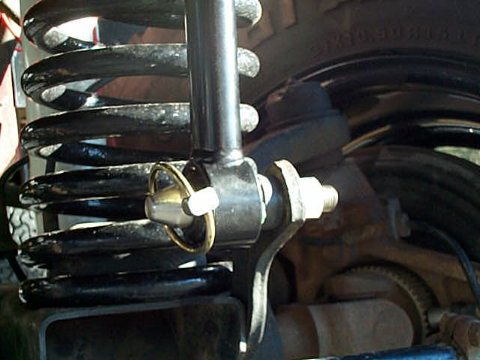 |
Now simply slide the bottom bushing over the steel mounting pin, insert the click-pin, pump some grease into the links (they don’t come pre-greased), and you’re ready to go.
To disconnect the swaybar, just pull the click-pin, slide the discon link off the mounting pin, swing the link and swaybar up, and secure them out of the way (see below). To reconnect it, just do the opposite. It’s as simple as that. |
| The holding pins are similar to the mounting pins that go on the axle, but they screw into the frame rails. As you can see, there’s no place on the XJ/ZJ “frame” to mount the holding pins, so XJ/ZJ owners will have to reply on the ol’ wire-tie method to secure the swabyar. JKS does supply big nifty yellow rubber bands to help with the securing duties though. TJ owners get to use the holding pins to keep the swaybar and links up and out of the way. |
 |
So far I’ve been very pleased with JKS’ new discon’s. They’re quiet, super easy and fast to use, and it feels like they actually tightened things up some around corners, though it may just be that the swaybar can function more effectively now that my swaybar links are the correct length. One thing I really like about the JKS dison’s, besides how fast they are, is that they can be reconnected one side at a time, unlike my previous Tomken dison’s that had to be reconnected at the same time (which required either two people or me laying on my back under the front bumper to do). At about $120, they’re some of the most expensive discon’s on the market, but so far they’ve been worth every penny.
For more information, contact:
JKS Manufacturing, Inc.
P.O. Box 98
Alliance, NE 69301-0098
308-762-6949
email: jksmfg@bbc.net
http://www.jksmfg.com/