


 |
Kilby Enterprise’s TJ gas tank skid plate |
Installation date: 12/12/00
This is the first of what I hope to be many articles covering the build-up of one particular yellow ’00 TJ. After running some trails with me and my XJ and slamming her gas tank on some rocks, my girlfriend Jennifer decided the stock tin skid plate protecting her gas tank wasn’t going to cut it. The search was now on for a gas tank skid plate for her TJ. After checking out the offerings of various companies and talking with the TJ guys over on the JU forums I decided to call Brad Kilby of Kilby Enterprises. I’d been already been talking with him about his York on-board air kits, so I was somewhat familiar with his new TJ gas tank skid plate. After talking with him and seeing the pics of his skid plate design, my mind was made up and I placed the order.
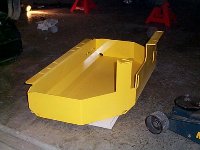
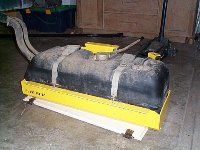
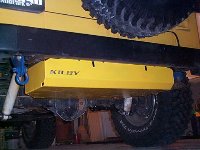
The skid is super beefy, built from 3 pieces of 3/16″ steel plate that are laser-cut, formed, then welded together. It uses the stock mounting locations to keep the installation time to a minimum and it replaces the factory tin skid, it doesn’t go over it like some other skids do. One of the big selling points for me was the fact that Kilby’s skidplate raises the gas tank for 3/4″-1″ of extra ground clearance under the gas tank compared to the factory skid. 4 drain holes keep the crud from building up around the gas tank.
The skid plate arrived about a week later in a large and very heavy box, the skid alone weighs in around 65lbs if I remember correctly. Definitely some beef here. The skid comes unpainted, which suited Jennifer just fine since she wanted to paint it yellow anyway to match her Jeep. Once she’d cleaned the unit, primered it, painted it (yellow Krylon spray paint), and let it dry, it was time to install this bad boy.
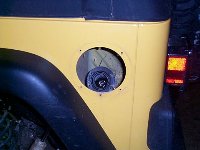
The first thing you’ll need to do is remove the gas cap then remove the filler ring (8 screws). Be sure to replace the gas cap, you wouldn’t want to spill any gas out on you! Oh yeah, since you’ll be moving and handling the gas tank itself, you’ll want to try and time this when your gas tank is almost empty so it’s as light as possible. Now cut the zip-tie holding the axle vent tube up and unbolt the ground strap from the chassis.
 |
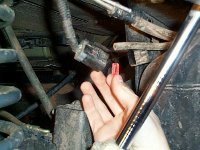 |
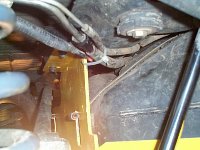
The fun part is figuring out how to get the red retainer clip out of the electrical connector on top of the gas tank. We ended up breaking part of it getting it out, but it’s not a big deal. You’ll also need to disconnect the EVAP hose by twisting and pulling it (be careful you don’t bend the steel tube). Next disconnect the high pressure line by using your fingers to pinch the two plastic tabs together and separate the connection. You’ll need to depressurize the fuel system first though, check with a service manual on how to do this.
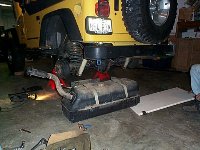
Now position a floor jack under the center of the factory skid plate and remove the 3 front nuts and 4 rear nuts that hold the factory skid plate to the frame. Slowly lower the tank assembly down while someone guides the filler hoses around the frame.
 |
 |
Next is the part we forgot to do (be sure to read through the directions carefully). Do a trial fit! Before strapping the gas tank in the new skid, lift the empty skid up into the Jeep to check how it fits. Some TJ owners may need to bend the front “stand-alone mount” back a bit to allow the stud to line up correctly. Lower the skid back down and make any needed modifications. Trust me, it’s much easier to bend that mount back before you have the whole thing half-way bolted up with the gas tank sitting in it…
Now, remove the 2 nuts holding the hold-down straps in place. Make a note of the placement of the fuel lines and disconnect the drivers side vent hose that is connected to the roll-over valve. Raise the two straps without bending them and lift the tank out of the factory skid plate. Slide the 2 straps in the Kilby skid, holding them straight up while placing the fuel tank into the new skid. Insert the strap studs into the holes and tighten the nuts. Do not over tighten! Due to the new shape of your skid plate, you will not have to thread the nuts as far up the stud as the factory skid setup was. Tighten them enough to secure the tank and keep it from moving. Don’t forget to reattach the vent hose for the roll-over valve.
 |
 |
Have someone guide the filler hoses as you raise the skid and tank up into place. Loosely install the 7 nuts and check clearances before torqueing everything down. Reconnect all the lines and hoses and replace the filler ring. Don’t forget to reconnect the ground strap. Then just start the engine and check for any fuel leaks and you’re good to go.
 |
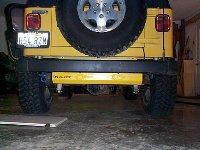 |
The tank fit great and at 60lbs, it’s one hefty chunk of metal. It’s going to take a lot to damage this thing.
For more information, contact:
Kilby Enterprises
1847 N. Keystone St.
Burbank, Ca. 91504
Phone: 818-848-2900
Fax: 818-848-2974
brad@kilbyenterprises.com
http://www.kilbyenterprises.com/