 |
Replacing a WJ Window Regulator |
Update: There’s now a great option to replacing the entire regulator assembly if all that is broken is the plastic cable block (which is what usually breaks). You can now buy a replacement metal block from digital tuning, inc, for about $30. Not only is this cheaper than buying a whole new assembly (even off ebay, where we bought ours) but you’re not scrapping a perfectly good window regulator assembly over one small part!
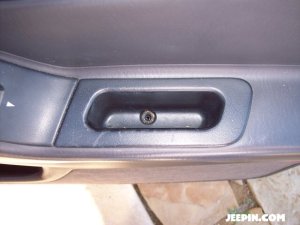
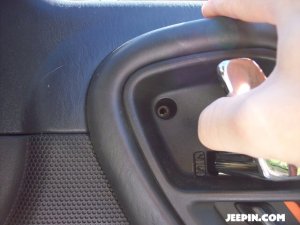
To get to the window regulator, we’ll have to pull off the interior door skin panel. There’s a phillips-head screw in the bottom of the handle (screw has already been removed in this photo). There’s a T25 torx bolt in the door latch pocket (bolt has already been removed). There’s one more phillips-head screw behind the round cover on the A-pillar of the door.
 |
 |
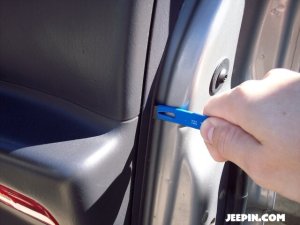
Once you get the 3 screw removed, use the small prybar to pop the trim clips loose that hold the door panel on. Be careful when you’re doing this, the clips are relatively easy to break. If you do break some of the clips though, you can get replacements from your local Jeep dealer. There are a total off 11 clips holding the front door panels on. This is the mini prybar I used during this project. They’re available from most home improvement stores (I got mine from Lowes) in a variety of sizes and don’t cost very much cash. You’ll be surprised how often they come in handy.
 |
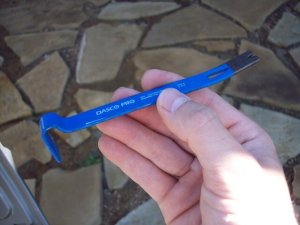 you’d be surprised how often this comes in handy |
Once you have all the clips pulled loose, you can pop the door panel off by pulling straight up and out.
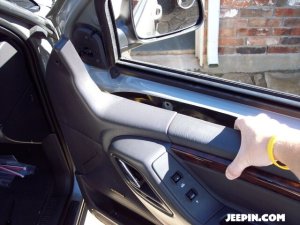
The door panel is still connected to the vehicle though so you can’t take it all the way off just yet. You’ll need to disconnect the latch and lock connecting rods by popping the white clips loose and pulling the levers straight up. Below the levers is a white electrical connector (barely visible in the bottom-center of the photo) which runs the door lock and power window. Push in on the tab on the back of the connector and pull it straight out.
 |
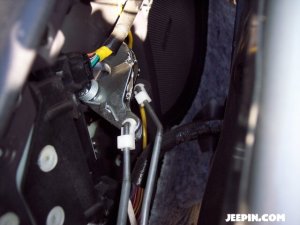 |
There’s also an electrical plug by the A-pillar that you’ll need to disconnect.
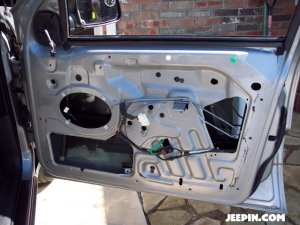
Now you can completely remove the door panel and set it aside. Next unscrew the speaker and disconnect the plug on the back of it and set it aside too.
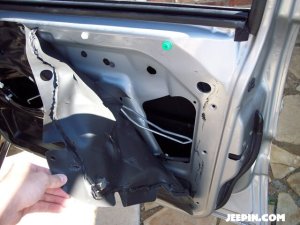
Now start to carefully peel back the black plastic. It’s stuck to the door frame using some sticky black caulk type stuff. It should peel off without too much trouble though, and if you do it right all the black caulk will come off with the plastic.
 |
 |
The new window regulator. These are driver and passenger-side specific, as well as front to rear specific. Because of the way it’s designed, you have to replace the entire assembly as a single unit, you can’t just replace the broken part.
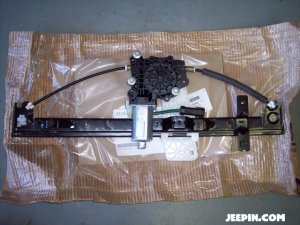 the new regulator in all its glory |
So now we need to set about removing the broken regulator from inside the door. The first thing to do is disconnect the window bracket from the regulator. There is a clip on each side of the regulator that holds it to the window bracket.
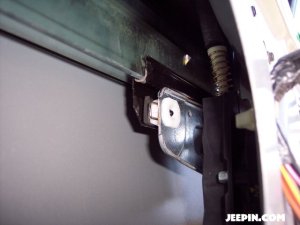 looking at the clip through the speaker hole |
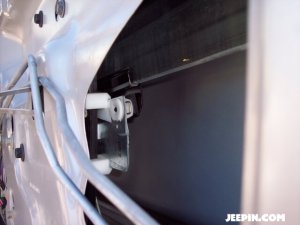 the clip on the other side |
Here’s where that mini prybar comes in handy again. The clips aren’t that hard to remove though, you could pull them off fairly easily with some small pliers.
With both clips removed you can pop the window bracket off the regulator piece. You’ll need to do both sides at the same time. Hold the window up so that you can reach through the speaker hole and the hole on the right of the door, then with one hand on each side of the window bracket, use your fingers to push the bracket away from the regulator. It should pop right out.
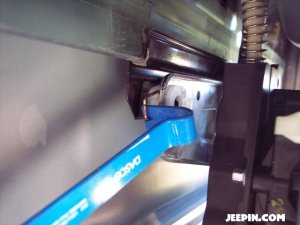 use the foot of the pry bar or some pliers to pop the clip out |
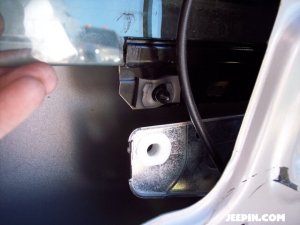 |
Now that the window is detached from the regulator you can slide it all the way up and out of the way. To make sure it didn’t come sliding back down on me, I used some blue painter’s tape to hold it up. The nice thing about the painter’s tape is that it doesn’t leave any residue on the glass or paint but is still fairly strong. I probably went a bit overboard using 7 pieces of tape but I wanted to make sure the window wasn’t going anywhere.
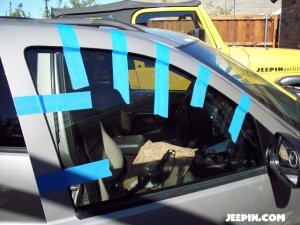 Looking good, Billy Ray! (someone has to get that quote…) |
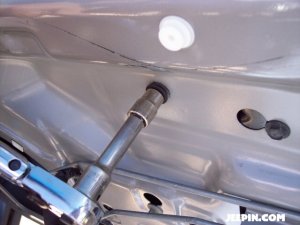 |
The regulator is held to the inside of the door by four 10mm bolts, and the motor is held on by three 8mm bolts. You only have to remove the top left and center bolts from the regulator. The other two bolts as well as the three bolts on the motor just need to be loosened as there are holes and slots in the door to get everything else out. This is actually a pretty nice design and really helps out when you’re putting the new regulator in because it keeps you from having to hold the regulator and motor in just the right spot to get the bolts started.
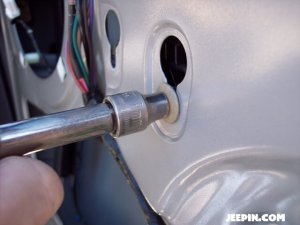 |
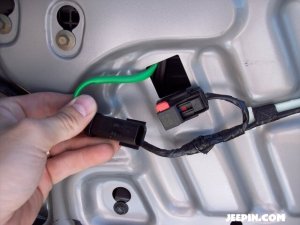 |
You’ll also need to disconnect the regulator motor control plug. To disconnect the plug push the red tab up, then push down on the black tab on the end opposite the regulator plug and pull the regulator plug out.
Once everything is disconnected you can wiggle the old regulator and motor down out out through the big access hole in the bottom of the door.
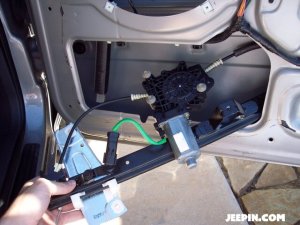 out with the old! |
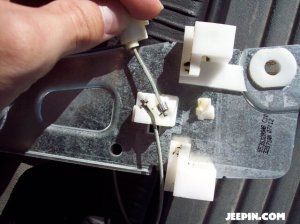 |
With the regulator assembly taken apart you can better see the bracket that breaks. The plastic tends to break right where the upper cable connects. Once this breaks, the top cable comes out and the whole window just slides down into the door. You can see how the upper cable (in my hand) is supposed to attach, along with the piece of plastic that breaks off.
To get the new regulator and motor into place, slip it into the bottom of the door sideways. Be sure you have it in the correct orientation (it will only bolt up one way). Once you get the whole assembly in the door, you can rotate it up and set it in place. It can take a bit of wiggling to get the bolts into their slots. What I found worked best is to get the bottom-most regulator bolt in its slot first, then get the motor bolts slipped in, then finally align the upper regulator bolt.
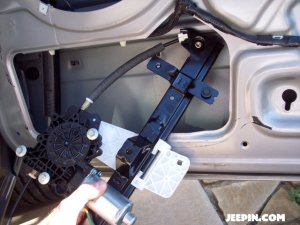 |
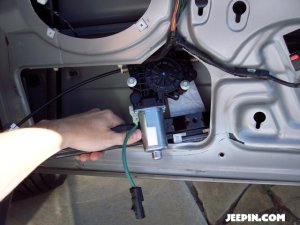 |
Snake the motor plug through the square hole and plug it back into the door wiring harness.
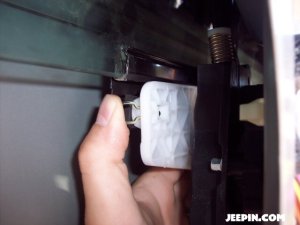
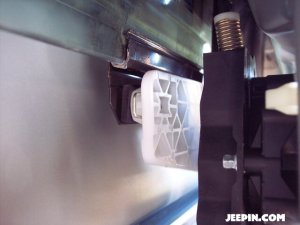
Now we need to lower the window back down into the door and snap the window bracket into the new regulator bracket. With the window bracket attached, pop the gold clips back on the regulator bracket. If you didn’t pop the gold clips off before installing the new regulator in the door, you’ll need to pull the off before trying to connect the window bracket to the regulator.
 |
 |
With the window connected to the new regulator it’s time to start putting the door back together. Just start putting everything back on in the opposite order in which you removed it. The black plastic liner goes on first, followed by the speaker, and finally the door panel itself. Be sure you get the door latch and lock connecting levers in the correct locations, they’ll really only go back on one way so it’s kinda hard to get them mixed up. Snap the lockcaps back onto the rods so they don’t pop loose. To get the door panel back on, slip it into place at the top of the door by the window seal, then line up the fasteners with their respective holes and go around the door panel pushing each one into place. Put the two phillips-head screws back in, along with the torx bolt by the door latch, and you should be ready to go.
40 comments40 Comments so far


Awesome instructions! I just finished replacing my driver side rear regulator, following your instructions. A couple things were different, like number of bolts, etc., but I got the job done in a little over an hour.
Thanks! You saved me $400 bucks in labor costs at a garage.
Kurt
Fantastic instructions… Save money and time, Great.
Best 🙂
Bonjour je suis à la recherche d’un léve vitre avant gauche pour jeep grand cherokee 3,1 TD de 2001
N° de série : 1J4GWB8431Y516463 WG
Merci
Perfect instructions! The pictures were very helpful, as was the description. It is definitely not necessary to actually remove the window, a bit of tape works just fine. I used a Dorman regulator, which cost $70 thru Amazon (no shipping) (fit perfectly, works smoothly and quietly). I also got a box of 50 interior trim clips for $11 (which includes mailing) from Clips and Fasteners.
Better instructions than the service manual. Pictures are a big help to understand the process of replacing the window regulator. Will install four metal cable blocks as soon as they come in the mail. Thanks for your efforts in posting this repair. You’ve made a difference!!
[…] See also Jeepin.com … […]
[…] […]
Great instructions! Easy to follow and understand. It took my boyfriend under an hour to complete start to finish! Thank you!
Thanks much for the instructions and photos. Made the job much easier. Mine was the passenger back window, but was also broken right where you said it would be. Instead of replacing the regulator, I drilled two holes just big enough for the pressed on end to fit (7/32) right through, right beside the broken plastic part. Fed the pressed on end through one then the other and when it laid flat, it couldn’t pull back through. Re-threaded wire and reassembled per you instructions and in about 2 1/2 hours and NO money out, window is working again. THANKS!!
Just replaced the driver side window regulator on my 2001 Grand Cherokee Laredo using these instructions. Saved me hundreds of $$’s at the shop. These instructions are one of the best and a very big thank you and a case full of chilled beer for the original poster.
OUTSTANDING INFO!!!!!!!!!!!!!..Thanks for the help!!
hi.to you jeep fanatic´s,i´m from portugal and my wj had sufer from that window problem too ,just wen y was on holidays with some perfect cenary in front ,nearby the picos of spain one of the most beauty around here,that litle peace break´s down,just imagine ur wife complain´s with 40 degres outside,without the possibilety of open a window….? i understand some things just fail,but for some of our lady´s is more complicated.congratulations on the magnificent fotos showing a step by step prouceder´s,i actualy solved myne buying a used one,ahve been treing for a hole afernom just in vain.
[…] […]
Thanks for this write-up, it was very helpful. I’d had experience opening up the door on my VW before but this was my first attempt with the WJ I bought last year.
Unfortunately, I was not able to simply replace the plastic block, the damage had already been done and the cable was kinked from being pulled into the spool too far. So, I did have to replace the whole regulator assembly. It was a piece of cake though and took me about 45min to put the new regulator in and put the whole door back together.
I’m still considering replacing the plastic block with the aluminum one sometime in the future just for the peace of mind. But, for right now, just having a working window was the priority.
Great write up, saved me a bunch of time versus feeling my way through the work on my own. Thank you.
After spending HUNDREDS getting the driver’s window regulator replaced with a factory part a few years ago at the repair shop, I opted to do it myself when the front passenger regulator went out.
The aftermarket part was only about $50, and the instructions here made it a breeze to replace; it only took an hour or so, and it’s like new!
Now, the driver’s MOPAR regulator has failed AGAIN, so I’ll be repeating the instructions here.
Thanks!
Great info! But, I need help with reassembly and adjustment.
My broken part turned out to be the PLASTIC (yes I”m yelling – cheap #@*%) half-cirle pulley on one end of the regulator. I read where another “genious” drilled a small hole and resecured his broken pulley with nut, washer and bolt. (how do you folks think of this stuff)
So I did. Works great.
But the cable was way to tight/short to work back around original path. I opened the regulator housing, gave myself some slack by unlooping one rotation, (I know that results in too loose of cable) so cut down, resecured, reassembled everything.
But window does not reach top of full-up position. I’m sure the cable is a little looser, regulator operation is not as brisk moving up; but, stops just short.
Is adjusting the regulator an option – or should I just replace???
Thanks.
Thanks. I just had to do both front windows. This helped a lot compared to real service manual.
Here’s a tip for y’all… I went to http://www.clipsandfasteners.com to get spare trim clips. Something like $10 for 25. Much better than paying the stealership over $4 for 1.
Bonjour je suis à la recherche d’un léve vitre avant droit
pour jeep grand cherokee 3.1 TD de 2001
n°de serie :1J4GWB8411Y514694
merci
Excellent information, thanks. My cable was twisted and looped in the spool so I had to remove the motor and the spool, rewind the two cables and reattach the motor (the wrong way round at first!). I heated the cables with a gas torch to straighten the kinks (hold the end of the cable in pliers using the regulator and motor as a plumbweight and heat gently & watch the kinks didappear) and if I was doing it again I would be more gentle removing the plastic spool as the grooves break easily. Once the spool was wound I drilled a couple of small holes in the plate next to the plastic block, pushed the ‘rabbit’ up one and down the other and pulled it taught (I started with a small bit and enlarged the holes in stages until the cable end would just fit through).
Total cost = $0 because I can’t be bothered to buy the blocks and ship them to the UK. There will be a minimal amount necessary to replace the broken trim clips but I think most of them were already dead.
To CigarXO – you need to ensure the cables are tight when you finish. I wrapped the spool with one on its pulley then the other off and compressed both springs and pulled the cable over the pulley before inserting the last guide onto the plate.
If that last paragraph makes no sense: email me for a clearer explanation [wolfhound@ntlworld.com]
and I apologise for the spelling error, obviously it is DISappear!!
I have fixed 4 of these on two jeeps so far (2001 Jeep Cherokee Limited and 2003 Jeep Liberty). The Liberty has a totally different regulator. But I used a $0.60 bag of cotter pins. Placed the cotter pin through the cable and bound it to the frame by placing it around an old nail on the backside to provide a “toe” hold. Lifetime warrenty for a $0.60 fix.
Great Instructions and pictures, just saved me several hundred dollars. Thanks!
[…] -8mm and 10mm sockets This write-up is in addition to the EXCELLENT "how-to" found here: Jeepin.com Replacing a WJ Window Regulator That "how-to" explains it all very well, but is specific to replacing the entire […]
Fantastic and easy instructions. Thank you for saving me a ton.
After talking the door off it locked. How do I get it open after everything is disconnected? Thanks
Here’s a fix I think everybody here will appreciate. I bought 2 regulator blocks and ordered a regulator from 1AAuto. Part #1A-WRG-00249. (Drivers side 04 Jeep Grand Cherokee). Much to my surprise, the blocks don’t fit the aftermarket regulator. So…I took the stock tin piece where the block fits and compared it to the aftermarket part and though there are some differences, but the window clips, block, and guides are exactly the same! So I installed the blocks on the OEM tin part, then swapped it for the aftermarket tin part and it works great! The moral of this story: “Don’t throw your bad OEM Jeep parts away”.
Awesome instructions and pictures!! I live in the land of many brew pubs, look me up and a jug or 2,,3,,4,,5,,of beer is on me.
please post more instructions for other repairs for Jeeps.
here’s a tip to others…don’t forget to price match the auto parts stores!! I found a regulator from the parts house I like but it had to be ordered. Autozone had it in stock for $99.99, they matched my parts store @ $62.99!! Autozone you have my biz as a 2nd choice next to my parts house.
Fantastic instructions! I actually had the cable snap so I had to replace the whole unit. They are around $60 at Autozone, A1 Auto, etc. I followed these instructions to the letter and it took me about 2 hours combined to remove and install. If there is a next time it would be even quicker. Thank You! There is also a helpful video on A1 auto about the same thing.
Great writeup! I highly recommend Digital Tuning’s replacement block, as those plastic ones will just keep breaking. I’ve had my ’02 Grand Cherokee for 8 years now, and I’ve had a few break. I finally decided to preemptively replace *all* my plastic blocks with the aluminum ones and it is for sure easier before it breaks. The last two I did today were about to break. I’ve never seen one of these plastic blocks that’s been in for any substantial amount of time not have cracks in it. But for some reason after it breaks and I have to rewind the cable around the spool inside the motor, it always ends up a little bit too short (maybe I’m winding it incorrectly?) and I end up having to cut off a bit of the sheath around the cable, which I’m sure isn’t the best thing to do.
Anyway, buy four of those things and just get it done. Having window regulators that don’t break is more than worth it!
Great guide! I just replaced the right rear regulator on my 01 WJ following the guide – I took my time and it still only took around an hour.
Thanks so much for the instructions. I had previously paid $400 a piece to get regulators fixed in the past, but with the instructions and a $60 part from amazon I was able to do the entire project by myself in just under 2 hours. Thank you!
I just want to say thank you for this. In fact I can’t thank you enough to take the time and trouble to do this. I thought fixing the electric window was beyond my abilities. Well not with this guide! Not only have I got a working window again, without having to pay a mechanic, I have a very happy wife who thinks I rule!
Awesome instructions! I am a 52 year old women. I just finished replacing my driver side rear regulator, One of the pins was a little hard to get too but after I got it out everything went smooth following your instructions. and now my window works just fine
Thank you for the great instructions
Patty
Thanks a million, this made a ‘scary’job easy! Great instructions!
Great instruction! Just fixed right side! Thanks from Germany!
[…] Originally Posted by Rocket254 Title says it all. It's a 2000 Jeep Limited. I was rolling the window up and at the top it made a loud pop and just started slowly falling down. Now it won't roll back up. What's wrong and is there a quick fix? Thanks in advance…. purchase the metal piece linked to in Windowsrookie post (might as well purchase 4 of them since if one regulator fails, the rest probably arent too far behind). Replacing the window regulator is not that bad of a job, just time consuming the first time around. Figure you'll probably spend about 1-2 hours doing it. http://www.jeepin.com/features/wj_window_regulator/ […]
MANY thanks! With no shops open on a Sunday and a wide open window on the streets of the big city, I picked up a regulator at a parts store and foolishly waded in. With your guide in hand, it only took me a couple of hours! More surprising, the window actually works!
Thanks for taking the time to lay it out so clearly for those of us not so handy. I’m not only impressed with your generosity, but your writing skills.
I know this post is a few years old, but I am looking for the actual sizes for the three bolts that attach the actual motor to the inner part of the door. Replacing one for a friend and these three bolts went missing. I need to just know the diameter and depth maybe; I can find some from that.
I just repaired the damaged plastic bracket. Just glued it together with superglue and some hot glue. What can i say? It works fine – i dont know for how long 😀 but a least i had no costs at all thanks to your instructions. I thought its a waste to throw away the whole thing just because one stupid little plastic thingy is damaged.