


 |
Rubicon Express 5.5″ Extreme Duty XJ kit |
Installation date: 11/02
Introduction | Rear Install | Front Install | Testing and Conclusions
Now comes the fun part… the front end! Again, since I’m replacing an existing 5-6” lift as well as swapping in a “new” front end, some of my photos may not be the norm.
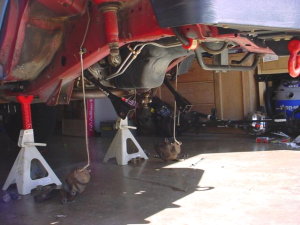
First thing you’re going to need to do, like you did with the back end, is jack up the front and support the body with a set of 6-ton jackstands. I set my stands under the frame rails behind the LCA mounts where the frame narrows a bit. This will get tricky later though, because you’ll have to move these jackstands to install the braces for the drop brackets, but you’ll still have to have the front end supported somehow… When I installed the braces, I moved the front jackstands outboard of the frame rails to the support legs of my Rocky Road Outfitters Step Rails. I also put a set of jackstands under the frame rails just behind the crossmember, kind of as a back up, just in case. You may want to start out with jackstands in a similar position to save the time and trouble of having to move them later.
 |
 |
With the front end supported on the jackstands and the axle still on the floor jack, start unbolting EVERYTHING. Start with the wheels of course, then unbolt the calipers and secure them to the body somehow – I’ve used large zipties in the past, but my current ultra-long SkyJacker brakelines were long enough that I was actually able to just set the calipers on the ground. Next unbolt the shocks and pull them out. Now unbolt the trackbar and disconnect the draglink from the pitman arm. If you’re still using the stock trackbar and bracket, you can save yourself some time and trouble by simply unbolting the trackbar from the axle, then unbolting the trackbar bracket from the frame. Since they’re both getting replaced, there’s no need to try and separate the trackbar from the bracket (which can be pretty hard sometimes with the OEM setup). Disconnect and remove the swaybar endlinks. You’ll probably want to unbolt the front driveshaft from the axle as well.
At this point the only things holding the axle on should be the upper and lower control arms and the coils. Now it’s time to lower the axle and pull out those coils. If you’ve still got the stock lower arms, you’ll probably need to unbolt these from the axle first in order to lower it enough to get the coils off easily. With the coils out, finish removing the control arms and you can lower the jack all the way to the ground. Pull out the caster shoes inside the LCA mounts on the frame, you’ll reuse these again later on.
 |
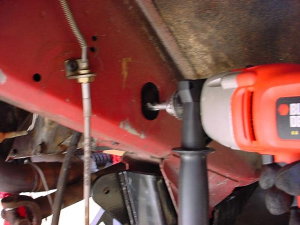 |
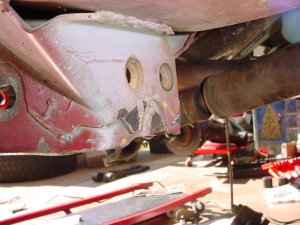
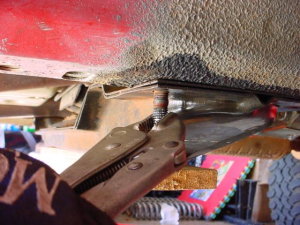
Before you put on the control arm drop brackets and braces, you’ll need to grind down the little lip that sticks out from the back of the OEM LCA mounts on the frame so it’s flush with the back of the mount. You’ll also need to drill out the original UCA mounting holes in the body. You’re going to want a relatively long drill bit and a drill that’s small enough to fit the nose into the access hole in the frame so that you can drill out the far UCA mounting hole.
 |
 |
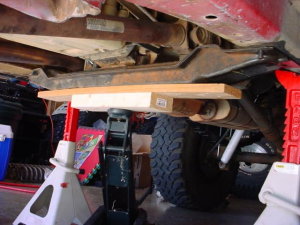
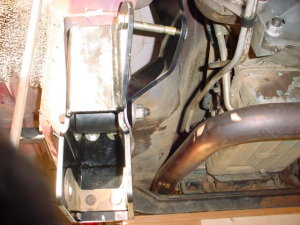
Here comes the fun… to install the braces (and t’case drop if you got that instead of shims), you’ve got to unbolt the crossmember and remove the studs that are threaded into the frame rails on each side. To do this, first support the crossmember with a floor jack and some boards (to distribute the weight along the crossmember itself). Next remove the bolts from each side and the nuts on the studs. Using some vise-grips grab the studs and slowly unscrew them from the frame rail. This is sometimes easier said than done however. You’ll definitely want to spray the crossmember bolts and studs with PB Blaster or WD-40 everyday for a couple of days before the install to try and make things go bit easier.
If you happen to break one of the bolts or studs for the crossmember, or break one of the weld-nuts loose inside the frame rail, don’t worry, too much anyway… Apparently there’s an access “hole” in the floor boards under the carpet in the front foot wells that’s directly above the weld-nuts inside the frame rails. I would also highly recommend reading through Tiffany’s drop bracket kit install report over at ILoveJeeps.com. She ran into some different problems than I did, and as some good insights on some fixes and work-arounds. The most important thing to remember when install the drop brackets and braces is to leave all the bolts loose until the very end. I’m sure that most of the problems I had aligning the holes in the braces to those in the drop brackets was because I tightened all the bolts on the drop brackets before connecting the braces.
Now lower the crossmember down a bit and slip the braces (and t’case drop spacers if you got them) in between the crossmember and the frame. The t’case drop spacers would go between the brace and the crossmember. Raise the crossmember back up and bolt it back on using the supplied bolts. Snug these bolts up but don’t make them too tight, you want to just be able to barely wiggle the braces a bit, to help you line them up with the drop brackets here in a minute.
 |
 |
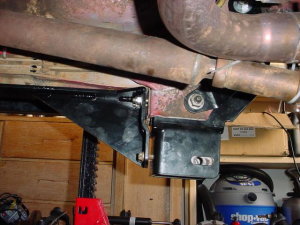
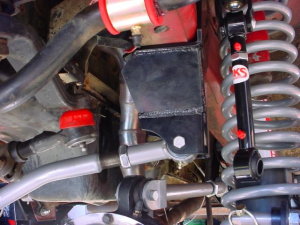
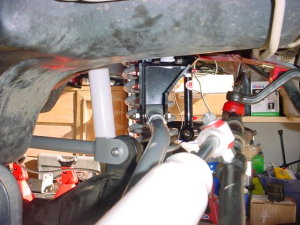
Now put the drop brackets on using the supplied hardware and spacers. The instructions for this part are marginal at best, but the LCA drop brackets really only fit one way, as do the plastic spacers. The UCA drop brackets can be a bit confusing to get on correctly, but hopefully these photos will help you figure out their orientation. Again, you’ll want to leave all the bolts a little loose so you’ve got some wiggle room to help get the drop brackets aligned with the braces.
 |
 |
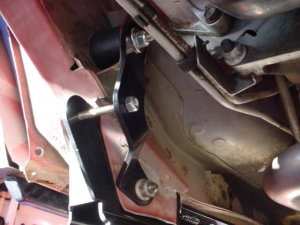
I had some alignment issues with some of the bolt holes on the drop brackets and braces, but it wasn’t anything a floor jack and drill bit couldn’t take care of. And if the new bracket for the UCA’s seems a bit wide at first like mine did (notice the washers I’d put in as shims), don’t worry, once you tighten up that UCA bolt it’ll snug everything up nice and tight.
 |
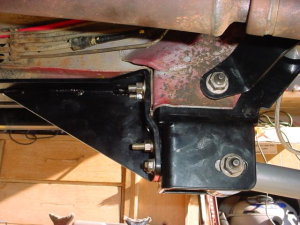 |
That wasn’t the only place I had gaps though… Not only did I have alignment troubles between the braces and drop brackets, but once I got everything in place there relatively large gaps between the braces and the LCA mounts. Not good. I originally tried tightening the supplied grade-5 bolts to pull the braces in, but the bolts broke. So I replaced those with some grade-8 bolts and that did the trick, for the top anyway.
 |
 |
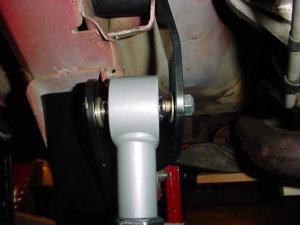
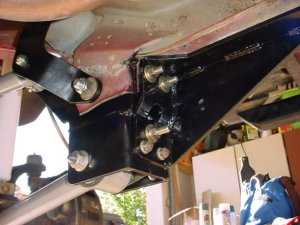
The lower half of the drop bracket kit is designed to use the studs on the back of the caster shoes to hold the brace and drop bracket together. Well, if grade-5 bolts couldn’t close the gap there was no way the smaller, older, and very rusty studs on my caster shoes were going to do the job. So I broke out the drill again and drill a 5th hole in the middle of the braces and drop brackets and put in another grade-8 bolt. Viola! That did the trick and took all the stress of the caster shoe studs so I wouldn’t have to worry about them breaking. Now all that’s left here is to put the control arms back in and tighten everything back up!
With the control arms taken care of, it’s time to put in the new coils and bumpstop pucks. For the bumpstop pucks you’ll need to drill a hole in the center of the coil pads on the axle. Then use the supplied self-tapping bolts to pre-thread the holes (this will save you some time and trouble later on). Once you’ve got the holes tapped, drop the bolts into the pucks and slip the pucks up into the coils. Now you can relatively easily put the coils in without having to try and get them over both the bumpstop tower on the body and the bumpstop pucks on the axle. Make sure the coils are seated on the pads properly, then snake a socket wrench through the coils and bolt the bumpstop pucks down inside the coils. This is where it’s nice to have already tapped the holes in the coil pads, so you don’t have to mess with trying to do it with the coils and pucks already in place.
 |
 |
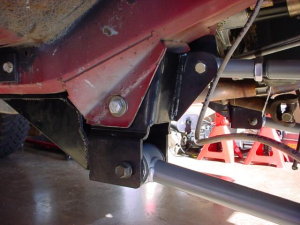
The trackbar is probably the easiest part of the whole ordeal. You just bolt the new bracket to the body and then bolt the trackbar up. Get all the trackbar and bracket bolts as tight as you can, otherwise they can work loose and/or cause some annoying noises while turning. If you got the optional JeepSpeed series trackbar brace, it just bolts up between the new trackbar bracket and some existing holes on the opposite frame rail. Like with the drop brackets, leave the bolts on the trackbar brace loose until you get them all in place, then tighten them down.
That’s really about it for the install of the kit. You’ll need to put on the new front brake lines (use that flare nut wrench), put the calipers back on, bleed the brakes, reconnect the draglink, adjust the trackbar, bolt up the new shocks, put on whatever swaybar disconnects you got, and torque down the control arm bolts once you’ve got the front end sitting on the wheels again. Once that’s all done and you’re ready to hit the road again, take your XJ to a shop and have the front end aligned. You MUST get your Jeep aligned any and every time you alter the suspension height.
3 comments3 Comments so far
Thanks for this post – I am looking for a lift at about this height. I have a 3” pro comp lift currently, and I have an SYE and custom driveshaft already installed. What I am wondering is what other things I will need to do (besides purchasing a kit like this) to run 35s. I know I will need to regear, but what about brakes, brake lines, possibly a longer rear drive shaft?, better steering components, shocks, steering stabilizer, etc. Thanks a lot.
-Bobby
Any lift kit of this height will come with all the suspension related components you’ll need, including brakelines, swaybar disconnects, etc. Depending on the brand, the kit may or may not come with shocks (if it doesn’t include shocks standard, you’ll need to get some). You’ll also need an SYE and CV driveshaft, but you’ve already got those.
Gears are a must. If you’ve got a D35 or a 27-spline Chrysler 8.25″ rear axle you’ll need to swap those out as well. (The 27sp C8.25 can be upgraded to 29-splines).
Steering just depends on the condition of your current parts. If you’re still running all stock steering I’d recommend at least upgrading to a heavy-duty tierod if you wheel the Jeep at all, regardless of tire size.
[…] and wanted something stiffer than the DT3000s I’d been running since I first installed my RE 5.5″ kit. Bilstein’s 5150s fit the bill with firm valving, a fixed cross-flow remote reservoir to […]