 |
Installing JB’s SYE kit and Tom Wood’s CV driveshaft |
Installation date: 10/16/99
Introduction:
I’m not really going to go into any depth on driveline vibs or what all causes them or the differences between all the slip-yoke eliminator (SYE) kits out there or CV vs. regular driveshafts…this will just cover the installation of the JB Conversions SYE kit and CV driveshaft from Tom Woods. I will say that when I was looking at SYE kits, I wanted a kit that used a new output shaft, so that ruled out the kit from Rubicon Express (not that there’s anything wrong with it though). Also, I’ve always heard Tom Woods’ name mentioned when it comes to getting the best custom driveshafts, so I’d pretty much already decided I’d go with him for the CV driveshaft. Tom sells two SYE/CV driveshaft combo kits. One uses the Currie SYE and the other uses the JB SYE. The Currie combo is about $575 and requires a core return, and the JB combo is $650 with no core return. Once I found this out I decided I’d go with one of his combo kits. After checking out both kits, I decided on JB’s because it uses a heavy-duty output shaft (54% stronger than stock; Currie uses a modified stock shaft) and comes with a custom tail housing. So, for $125 more I’d get a much stronger setup that I would never have to worry about (though I’ve never heard of anyone breaking the output shaft in the t’case). So, I called up Tom and placed my order. Oh yeah, this is all going on an NP231 t’case.
If you’ve got the NP242 t’case, I think Currie and Rubicon Express are the only SYE options for that t’case. For more info on SYE’s and the NP242, check out this article on installing RE’s 242 SYE kit:
http://www.polytropia.com/cherokee/sye.html
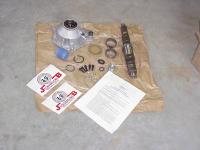
The driveshaft and SYE kit came in at roughly the same time (the JB kit is actually drop-shipped directly from JB), and both were well wrapped and boxed. You can get your driveshaft painted in any color, but I opted for a special polished clearcoat finish ($15 extra). The only problem with this finish is that it is somewhat prone to rusting in wet climates, so Tom doesn’t even offer it to some areas of the country (or so I’ve been told).
I’d talked to a lot of people about installing the kit myself, and most said it’s not that bad to do yourself (plus it’s a lot cheaper than having a shop install it). They also said it’s easier to do if you remove the t’case first, but that it could be done by splitting the t’case on the rig. Well, after looking at the t’case, I decided I would leave it on the rig as it looked extremely hard and involved to remove the t’case (FWIW, I have the AW4 auto tranny). I figured while it might be harder to install the SYE with the t’case still on the rig, it would be easier in the long run since I wouldn’t have to mess with pulling the t’case and trying to get it back in. In hindsight, I think I was right. If I was to do it again, I wouldn’t even consider trying to pull the t’case to do the install.
The complete install took me all day, but that includes 3 trips to SEARS for more tools, stopping for pictures, snack breaks, and a run to the machine shop on campus to press in some bearings. That’s the really tricky part about the JB kit: it requires you to press in some bearings, so you’ll need some way to do this. Other “special” things you’ll need are the biggest pair of lockring pliers you can find (snapring pliers won’t work very well, trust me), a 28mm or 1-1/8″ socket (for the yoke nuts), a 10mm 12-point socket, a 15mm socket, a flathead screwdriver, a torque wrench, metric allen wrenches, and a socket wrench extension (3″ is good). You’ll also need a liter of ATF fluid and some silicon gasket maker. If I hadn’t had to make so many trips so SEARS, and wasn’t stopping all the time to take photos, I probably could have done the install in 4-6 hours easily.
After everything was installed the vibs were completely gone. When you use a CV driveshaft, the pinion has to be within 3-degrees of the driveshaft or it will vibrate. My 1.5″ lift shackles tilt the pinion up about 3 degrees, and I also installed some 3.5-degree shims to tilt the pinion up even more. The amount of tilt is not causing any problems for the rear shocks, and the bottom bushings seem to be just fine. I figure I’m still off by about 1-2 degrees, but it’s not causing any vibrations, so I’m not going to worry about it. And so far no leaks from the t’case, so it looks like I got everything sealed up good as well.
3 comments3 Comments so far


[…] http://www.yuccaman.com/jeep/porc_sye.html http://www.links4jeeps.com/writeups/231sye/3.php http://jeepin.com/features/sye And as the others before said, there's no putting a body lift on an XJ, unless you cut the body […]
[…] http://www.yuccaman.com/jeep/porc_sye.html http://www.links4jeeps.com/writeups/231sye/3.php http://jeepin.com/features/sye It isn't too complicated. Just pay attention to where everything goes. Don't lose the o-ring that […]
[…] http://www.yuccaman.com/jeep/porc_sye.html http://www.links4jeeps.com/writeups/231sye/3.php http://jeepin.com/features/sye The rest wasn't too complicated. Took me several hours, but I was taking my time trying to be […]